How to create a UI for PowerShell
How can I make a User Interface for PowerShell?
I receive this question frequently, not just from the community but also from colleagues. While there are numerous blogs addressing this topic, I've noticed that some of them might be challenging to understand or to get going. To contribute in my own way, I've decided to share my approach to creating a user interface (UI)...WARNING. This may become addictive, continue at your own risk!
I always begin by asking, "What functionalities do you want the UI to have?" This inquiry helps me grasp the desired complexity and design method of UI they're seeking. When it comes to UIs, they generally fall into two methods: single-threaded and multi-threaded. Unless you're well-versed in code development, these terms might seem confusing. Frankly, even I find them challenging at times. To simplify the explanation, I usually explain it this way:
- In the world of PowerShell, a single-threaded UI is one where each click or input prompts a singular action. To put it plainly, whenever you click or input something, the UI produces just one output in response. If you need the UI to handle multiple items in one go, a single-threaded UI might "freeze" until all items are processed or, in some cases, even crash. It's crucial to understand that PowerShell naturally operates in a single-threaded mode. While single-threaded applications excel at tasks like form filling, they aren't ideal for processing data.
Examples of single-threaded UIs include forms that need to be filled out, screens displaying images, or completion notifications.
INTERESTING FACT: the PSD wizard, I talked about in earlier blogs, is a single threaded UI
- A multithreaded UI provides enhanced functionality, but it comes with a coding effort that is nearly two to three times greater. In PowerShell, the UI functions within a runspace or thread. What makes it interesting is that, in a multithreaded script, the initial caller, such as Powershell.exe, will initiate the UI as a distinct process and then finish its code execution, unlike a single-threaded scenario where the PowerShell caller continues running until the UI is closed. However, it's important to emphasize that the code complexity is significantly higher in a multithreaded setup.
Ok enough with the explanations...To keep things straightforward, I'll walk you through the steps to create a user interface. After that, I'll explain how you can use PowerShell to launch the UI and make it interactive in a single-threaded manner.
In a later post, I'll demonstrate how to implement a multithreaded approach using the same UI design.
Create a Project
First and foremost, you'll need a UI editor. My recommendation is Visual Studio (not Visual Studio Code). If you have a license, go for the Pro or Enterprise edition; otherwise, the Free Community edition works just fine. It's a hefty download (9GB+), but in my opinion, it's the top choice for crafting user interfaces. Here is how to get started:
- Download the bootstrapper and install Visual Studio from here
- During the install, it will ask what type of workload (aka projects) you will developing for, look for a build environment with the words: .Net, or Windows Platform in it.
- Click Install (this can take a while).
- After installation you can close the Visual Studio Installer window.
- If Visual Studio is not already launched, open it from start menu.
- You may get a sign in page. If so, you can skip this for now.
- Choose your theme, then click Start Visual Studio
- At the getting started windows, click Create a new project
- In the search bar on top, search for XAML, select one of them
TIP: It doesn't matter which type of XAML template; you are only going to use the XAML editor
- Give it a name and location
- Click Create


- Solution Explorer Pane: Typically located on the right. This is where your XAML files are stored and where you can create new XAML files. Leave the structure in place, but you will only deal with XAML you create (not what is included).
TIP: If the Solution Explorer pane is not visible, you can open using Ctrl+Alt+L or ViewàSolution Explorer
- Design Pane: Typically located in center. This is the What-You-See-Is-What-You-Get (WYSIWYG) designer. This screen will display the UI for easy editing.
- Editor Pane: Typically located below the Design Pane. This is the XAML source code of what is in the Design Pane UI. This is the code you will be using within PowerShell.
- Toolbox Pane: Typically located on the left. This is collection of UI elements you can use in the UI. Simply drag and drop them in the Design Pane UI
- Properties Pane: Typically, not visible until you want to edit a design element from the Toolbox.

Design the UI
Let's start designing!- Be sure the MainWindow.xaml is opened with the Design Pane. When the project first launches, it may have already opened the MainWindow.xaml file for you, if not you can double click on it in the Solution Explorer to the right.
- You may close the MainWindows.xaml.cs file (if opened); we aren't going to be writing c-sharp code
- On the left there is a toolbox menu (it may be minimized). Open it and start dragging interactive items from toolbox. The toolbox can also from ViewàToolbox or WindowàShow Sidebar tab
- We want to add these elements to the MainWindow page
- Label
- Textbox
- ComboBox
- Check Box
- 2x button
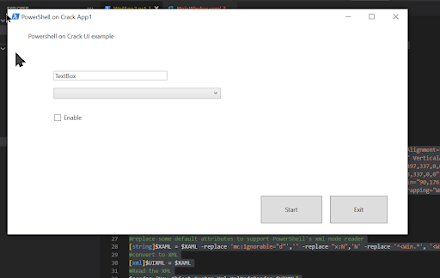
- Move the items around in the order you prefer. Mine looks like this:
- Now that the items are in the UI, you need to define their names. This is required for PowerShell to "control" the element. Also, a its VERY IMPORTANT to keep these unique throughout the entire design process! You can define them in two ways:
- Editor Pane: Look for x:Name and edit its value (my preferred method)
- Properties Pane: edit the name on top
- The next step involves providing meaningful context to each element. Simply labeling an element as a 'Button' doesn't convey much to the user. These labels can be modified either in the Properties Pane under the Common dropdown or in the Editor Pane. It's worth noting that some elements utilize 'Context' as the property, while others use 'Text'.
- You have the option to modify it directly in the Design Pane, but I recommend avoiding this method whenever possible. If you accidentally double-click an element, Visual Studio will automatically generate a click action property and file. While the file can be closed, you'll need to remove the property using the Editor Pane
WARNING: This is not compatible when we import the code into PowerShell and will fail to load! - Once you have all the element renamed and the content looking the way you want it, your essentially done. You like, you can take is a step further and edit the title as well.
- Here is what mine looks like.
TIP: If you noticed, I gave the names a three-letter type as the prefix; this helps me later on in the PowerShell coding. - (Optional) If you want to create different UI elements. you can do the same repeating this process on different XAML files. To add a new XAML file, right click and empty area within the Solution Explorer pane and navigate to AddàWindows (WPF). Give it a name and click add.
- Here are some additional tips to keep in mind:
- There are alot of items to add to a UI. Each item has their own set of properties. You can use the Telli sense in Editor pane to see what properties exist.
- Labels don’t need names unless you want it to dynamically update during UI…I use labels for versioning, static information, or display messages in UI
- Name your elements that make sense to you. Make sure they are unique.
- When you are satisfied with the result. Save your project and file. (File à Save All)


TIP: If you don't see the Properties pane you can right click an element and click properties or click on the bulb icon and go to View All Properties


Launch the UI with PowerShell
- Open your favorite PowerShell editor. I typically use Visual Studio Code
- Create a new .ps1 file. I named mine the same as my app (eg. WpfApp2.ps1)
- To create an interactive app with PowerShell, there are a few bits of code required to make it all work. In summary these steps must happen (in order):
- load Windows Presentation Assembly (not windows forms)
- Import XAML (as file or embedded) and convert to XML
- Convert XML into a Markup language (aka UI)
- Convert named elements to PowerShell variables
- Load Event handlers for dynamic control
- Load actions for button controls
- Present UI
- I usually start with a basis when I write UI's. Here is a code snippet needed for a single threaded UI. Copy the below code template into PowerShell
script.
#Load the Windows Presentation Format assemblies
[System.Reflection.Assembly]::LoadWithPartialName('PresentationCore') | out-null
[System.Reflection.Assembly]::LoadWithPartialName('PresentationFramework') | out-null
#Embed xaml code in script
[string]$XAML = @"
"@
#replace some default attributes to support PowerShell's xml node reader
[string]$XAML = $XAML -replace 'mc:Ignorable="d"','' -replace "x:N",'N' -replace '^<Win.*', '<Window'
#convert to XML
[xml]$UIXML = $XAML
#Read the XML
$reader=(New-Object System.Xml.XmlNodeReader $UIXML)
#Load the xml reader into a form as a UI
try{
$UI=[Windows.Markup.XAMLReader]::Load( $reader )
}
catch{
Write-Error $_.Exception.HResult
}
#take the UI elements and make them variables
$UIXML.SelectNodes("//*[@Name]") | %{Set-Variable -Name "$($_.Name)" -Value $UI.FindName($_.Name)}#=======================================# EVENTS AND INTERACTIVE ELEMENTS #======================================= #PRESENT UI $UI.ShowDialog() - Copy the XAML code from Visual Studio and paste in between the “@ and @” lines of code in PowerShell:
#embed xaml code in script
[string]$XAML = @"
<Window x:Class="WpfApp2.MainWindow"
xmlns="http://schemas.microsoft.com/winfx/2006/xaml/presentation"
xmlns:x="http://schemas.microsoft.com/winfx/2006/xaml"
xmlns:d="http://schemas.microsoft.com/expression/blend/2008"
xmlns:mc="http://schemas.openxmlformats.org/markup-compatibility/2006"
xmlns:local="clr-namespace:WpfApp2"
mc:Ignorable="d"
Title="PowerShell on Crack App1" Height="450" Width="800">
<Grid>
<Label x:Name="lblHeader" Content="Powershell on Crack UI example" HorizontalAlignment="Left" Margin="35,10,0,0" VerticalAlignment="Top" Width="310"/>
<ComboBox x:Name="cmbSelection" HorizontalAlignment="Left" Margin="90,125,0,0" VerticalAlignment="Top" Width="328"/>
<Button x:Name="btnStart" Content="Start" HorizontalAlignment="Left" Margin="495,370,0,0" VerticalAlignment="Top" Height="54" Width="120"/>
<Button x:Name="btnExit" Content="Exit" HorizontalAlignment="Left" Margin="634,370,0,0" VerticalAlignment="Top" Height="54" Width="113"/>
<CheckBox x:Name="chkEnable" Content="Enable" HorizontalAlignment="Left" Margin="90,176,0,0" VerticalAlignment="Top"/>
<TextBox x:Name="txtName" HorizontalAlignment="Left" Margin="90,92,0,0" TextWrapping="Wrap" Text="TextBox" VerticalAlignment="Top" Width="223"/>
</Grid>
</Window>
"@ - Remember what I mentioned earlier with the click action. When I first was testing this, I forgot to remove it and this what happens...doh!
- If all goes correct, the UI will launch
- If you did what I did, and moved the buttons to bottom of the UI, you will notice when PowerShell launches it, it cuts off a portion of the bottom. This is due to the rendering of the UI in Windows. There are workarounds: https://stackoverflow.com/questions/19101525/wpf-window-layout-looks-different-from-vs-designer-when-running but I just edited the UI in designer and move the buttons up a little more.
- I am happy with the results:
- But wait...the EXIT button does not work....why? The code used above, only launches the UI, it does not make it functional. More code would have to be added to get it to be more interactive. Since this UI has a borders (they may be invisible in Windows 11), the Windows default menu is added, you can use the X on top right to close. In the next session will make the UI interactive.
WARNING: When dealing with embedded code also make sure the "@ is not tabbed over; it must always be the to the far left.


Make the UI interactive in PowerShell
This is the phase where the complexity of the work significantly intensifies. In PowerShell, the possibilities for UI manipulation are virtually limitless. For instance, you can attach events to elements to trigger specific actions, relocate an element by modifying its margin property, provide a dropdown list for selection, disable an element until certain criteria are met, or even hide elements from view. The range of options is vast. Throughout this tutorial, I will endeavor to cover the majority of these actions in detail.
- The first thing I always do is make sure the exit button (if it exists) is working. Add this to the code #=======================================# EVENTS AND INTERACTIVE ELEMENTS#disables the window X$UI.Add_Closing({$_.Cancel = $true})#exit action for button$btnExit.Add_Click({#then add to all closeable controls like exit button:$UI.Add_Closing({$_.Cancel = $false})$UI.Close() })
- Now when the UI is ran, the Exit button now works. You will also notice the X no longer works. This is because of the line above it. This is intentional as we progress through the code.
- (optional) Next add the "chromeless" to the XAML code, update the script with new XAML and rerun the script.
- You might observe that the title bar is now absent, and the conventional Windows buttons are not visible. This design choice gives the UI a sleek and modern appearance. The only way to exit is by utilizing the Exit button. Additionally, you might notice another feature – it's not movable. Why is that the case?
- When a UI lacks a window frame, the operating system perceives it as stationary or non-movable. To enable the UI to be dragged across the screen, you can enhance your code by adding an additional line. This modification informs the system that the UI is interactive and can be moved, enhancing the user experience:
#add the ability to drag windowsless screen around
$eventHandler_LeftButtonDown = [Windows.Input.MouseButtonEventHandler]{$this.DragMove()}
$UI.Add_MouseLeftButtonDown($eventHandler_LeftButtonDown) - Next let's add some functionality to the text, and combo box elements. Let's pretend we want the username to display in the text field. We can simply add this:#add user name to the textbox$txtName.Text = $env:USERNAME
- Now lets say we want the user to select an application from the list. Since a combobox is just a list of items, in PowerShell we use its "list" as an array. #add items to the combobox@("Adobe Reader","Mozilla FireFox","Power Bi","Google Chrome") | ForEach-Object {$cmbSelection.Items.Add($_) | Out-Null}
- Imagine the checkbox determines whether a reboot occurs after installation. First, we need to make sure the UI reflects this choice, not just a generic 'Enabled'. There are two methods: editing the XAML content value directly or updating it in the PowerShell script. Normally, I'd handle this in the designer if it's a constant, but for demonstration purposes, I'll show how to do it in the script. Similar to the text element, update the content value as follows:#update the label of the checkbox$chkEnable.Content = "Reboot (if needed)"
- The UI is coming together, but I think the title of the app needs to be updated. Since my example is for Application installer, I named it appropriately:#update the title of the window$UI.Title = "Application selector"#update the label of the window and make it bigger$lblHeader.Content = "Select the application to install"$lblHeader.FontSize = 20
- So far this is what the UI will look like:
- But what happens when the user clicks Start? does it do anything? Not at the moment, like the exit button in the beginning, it needs an action event as well. Let's make it simulate an install process when clicked based on the selected item and reboot if the check box is checked.#start action for button$btnStart.Add_Click({#get the application path and arguments from the comboboxswitch($cmbSelection.SelectedItem){"Adobe Reader" {$appPath = ".\apps\AdobeReader.exe";$args="/sAll /rs /msi EULA_ACCEPT=YES"}"Mozilla FireFox" {$appPath = ".\apps\Firefox.exe";$args="/s"}"Power Bi" {$appPath = ".\apps\PowerBi.msi";$args="/qn /norestart"}"Google Chrome" {$appPath = ".\apps\Chrome.exe";$args="/silent /install"}}#do install based on extensionIf($appPath.Split(".")[-1] -eq "exe"){Write-Host "Start-Process -FilePath $appPath -ArgumentList `"$args`" -Wait"}else{$args = "/i $appPath $args"Write-Host "Start-Process -FilePath msiexec.exe -ArgumentList `"$args`" -Wait"}If($chkEnable.IsChecked){Restart-Computer -Force -WhatIfWrite-Host "Restart-Computer -Force"}else{Write-Host "No reboot needed"}})
- When ran and the proper interaction were performed, then the output is:However, if no App was selected it would error:
- The UI is considered finished as long as the "Start" button performs its intended function and users interact with it appropriately. Nevertheless, there are some additional aspects to contemplate in a UI like this. You might wonder:
- What if the user never selects an App and clicks Start?
- What if the App doesn't need a reboot, should that option be displayed?
- Is there a way to show the status of the install?
- These are all valid inquiries, and most of them can be addressed with some additional code. To tackle the first concern, let's consider a situation where the user fails to select an option. A practical solution is to disable the "Start" button until an application is chosen. Here's how you can achieve that:#disable the start button until an item is selected$btnStart.IsEnabled = $false$cmbSelection.Add_SelectionChanged({If($null -ne $cmbSelection.SelectedItem){$btnStart.IsEnabled = $true}})
- Next, we should hide the reboot option only if an app is selected that may require a reboot. Let's pretend that Adobe and Power Bi may require a reboot. Instead of using the code in the step above, we added some additional logic to it:#hide the checkbox until an item is selected$chkEnable.Visibility = "Hidden"#disable the start button until an item is selected$btnStart.IsEnabled = $false#create event for combobox selection$cmbSelection.Add_SelectionChanged({#reset the checkbox on each selection$chkEnable.IsChecked = $falseswitch($cmbSelection.SelectedItem){"Adobe Reader" {$chkEnable.Visibility = "Visible"}"Mozilla FireFox" {$chkEnable.Visibility = "Hidden"}"Power Bi" {$chkEnable.Visibility = "Visible"}"Google Chrome" {$chkEnable.Visibility = "Hidden"}}If($null -ne $cmbSelection.SelectedItem){$btnStart.IsEnabled = $true}})
- Another thing to consider is that the user may install one app, then want to install another. We may want to disable the start button and re-enable when done, so the user can select another. Or even disable the option to select another app until complete! To this we add additional logic to Start button to disable it when clicked and enabled when done. #start action for button$btnStart.Add_Click({$btnStart.IsEnabled = $false$btnStart.Content = "Installing..."#get the application path and arguments from the comboboxswitch($cmbSelection.SelectedItem){"Adobe Reader" {$appPath = ".\apps\AdobeReader.exe";$args="/sAll /rs /msi EULA_ACCEPT=YES"}"Mozilla FireFox" {$appPath = ".\apps\Firefox.exe";$args="/s"}"Power Bi" {$appPath = ".\apps\PowerBi.msi";$args="/qn /norestart"}"Google Chrome" {$appPath = ".\apps\Chrome.exe";$args="/silent /install"}}#do install based on extensionIf($appPath.Split(".")[-1] -eq "exe"){Write-Host "Start-Process -FilePath $appPath -ArgumentList `"$args`" -Wait"}else{$args = "/i $appPath $args"Write-Host "Start-Process -FilePath msiexec.exe -ArgumentList `"$args`" -Wait"}If($chkEnable.IsChecked){Restart-Computer -Force -WhatIfWrite-Host "Restart-Computer -Force"}else{Write-Host "No reboot needed"}#reset the combobox and remove the previous selected item$cmbSelection.Items.Remove($cmbSelection.SelectedItem)$cmbSelection.SelectedItem = $null$cmbSelection.Items.Refresh()$btnStart.Content = "Start"})
- Here is a recording of what it would look like
- Keep in mind, none of these actions will function correctly because the necessary applications are not present in the specified path. However, to illustrate the potential outcome if an application were to be installed while the program is running, I created a loop statement. This loop runs a counter for 10 iterations for each installation, simulating the process and demonstrating what would occur if apps were installed during the program's execution.
- When you click "Start," you'll observe that the UI becomes unresponsive until the process completes. To indicate ongoing activity, I've included an output displaying dots ten times. These dots signify that the process is still running even though the UI appears frozen. This happens because the UI is not multithreaded, which means any action it performs has to wait until it's finished before the UI can update.
- Some other things to consider:
- If you've been extensively testing your code, you might have encountered issues like PowerShell crashing or the app failing to run until the PowerShell session was restarted. This happens due to memory not being properly cleaned up, particularly if you run the app frequently. However, there are methods to enhance app responsiveness.
Learn more here: ShowDialog() Sucks: Use ApplicationContext and Run Instead | netnerds.net - The default styling isn't all that great. However, there are ways to add clean lines and a more modern UI look. As an example, you could add a style like this into the XAML and it will style your buttons nicely:
Paste this code in between the windows and grid code:<Window.Resources>
<ResourceDictionary>
<Style TargetType="{x:Type Button}">
<Setter Property="Background" Value="#FF1D3245" />
<Setter Property="Foreground" Value="#FFE8EDF9" />
<Setter Property="FontSize" Value="15" />
<Setter Property="SnapsToDevicePixels" Value="True" />
<Setter Property="Template">
<Setter.Value>
<ControlTemplate TargetType="Button" >
<Border Name="border"
BorderThickness="1"
Padding="4,2"
BorderBrush="#336891"
CornerRadius="1"
Background="#0078d7">
<ContentPresenter HorizontalAlignment="Center"
VerticalAlignment="Center"
TextBlock.TextAlignment="Center"
/>
</Border>
<ControlTemplate.Triggers>
<Trigger Property="IsMouseOver" Value="True">
<Setter TargetName="border" Property="BorderBrush" Value="#FFE8EDF9" />
</Trigger>
<Trigger Property="IsPressed" Value="True">
<Setter TargetName="border" Property="BorderBrush" Value="#FF1D3245" /><Setter Property="Button.Foreground" Value="#FF1D3245" />
<Setter Property="Effect">
<Setter.Value>
<DropShadowEffect ShadowDepth="0" Color="#FF1D3245" Opacity="1" BlurRadius="10"/>
</Setter.Value>
</Setter>
</Trigger>
<Trigger Property="IsEnabled" Value="False">
<Setter TargetName="border" Property="BorderBrush" Value="#336891" />
<Setter Property="Button.Foreground" Value="#336891" />
</Trigger>
<Trigger Property="IsFocused" Value="False">
<Setter TargetName="border" Property="BorderBrush" Value="#336891" />
<Setter Property="Button.Background" Value="#336891" />
</Trigger>
</ControlTemplate.Triggers>
</ControlTemplate>
</Setter.Value>
</Setter>
</Style>
</ResourceDictionary>
</Window.Resources>

INFO: This involves employing an event handler, instructing PowerShell to monitor left mouse events and initiate dragging for the object that invokes it. An interactive element is integrated into the UI object, triggering the event exclusively when the user clicks and holds down the left mouse button. This mechanism allows for smooth dragging functionality within the user interface.


Source Code
If you are looking for the source code from this post. I put it here.
Next
Stay Tuned...
Resources
- WPF & PowerShell – Part 1 ( Hello World & Welcome to the Week of WPF ) - PowerShell Team (microsoft.com)
- PowerShell and WPF: Introduction and Building Your First Window | Learn Powershell | Achieve More (learn-powershell.net)
- Generating Windows 10 Notifications With PowerShell | Den Delimarsky
- Building a Clipboard History Viewer Using PowerShell | Learn Powershell | Achieve More (learn-powershell.net)
- Powershell GUI : Add MahApps Metro Theme with Powershell | Syst & Deploy (systanddeploy.com)
- https://blog.netnerds.net/2016/01/adding-toolbar-icons-to-your-powershell-wpf-guis/

Comments
Post a Comment